How to make a sphere in SketchUp with Follow Me
Make a sphere from a flat path circle and an upright profile, type and check its radius, then sweep with Follow Me. Includes web and iPad controls, segment choices, face checks and half-profile shapes.
Draw a circle on the ground, draw a second circle perpendicular to it with its center on the same vertical axis, then select the ground circle's edge and use Follow Me on the upright face. The upright circle sets the ball's radius; the ground circle supplies the path. This built-in method works on desktop SketchUp, in the browser and on iPad.
I'd start with 48 segments on each circle because it keeps a small ball editable while giving you a useful starting silhouette. Type the radius instead of judging a drag: for an example ball with a nominal diameter of 300 mm, enter 150mm. The steps follow SketchUp's sphere and bowl workflow; no extension is needed.
Find the two tools and choose the circle size
Draw in empty space, away from existing loose geometry. Keep the path and profile in the same editing context: both loose, or both inside one open group. Follow Me requires the selected path and profile to be in the same group when the model uses groups.
| Surface | Circle | Follow Me |
|---|---|---|
| Desktop, Windows or Mac | Press C, or use the Drawing toolbar. | Press Shift + S to open Search, type Follow Me and choose the classic Follow Me result. It has no default letter key. |
| SketchUp for Web | Press C, or open the Expanded Toolset at the bottom of the Main Toolbar. | Open the Expanded Toolset and choose Follow Me. |
| SketchUp for iPad | Choose Circle on the Main Toolbar. | Open the Expanded Toolset at the bottom of the toolbar and choose Follow Me. |
The web Expanded Toolset lists Circle and Follow Me, while the iPad has Circle on its Main Toolbar and Follow Me in its Expanded Toolset. On desktop, the default shortcuts assign F to Offset and S to Scale. Neither key starts Follow Me; assign a custom shortcut if you use it often.
SketchUp 2027 also includes Procedural Follow Me. It keeps the inputs in an editable procedural component, as the current Follow Me guide explains. Use classic Follow Me for the loose-geometry steps below; the procedural result already has a component around it.
Activate Circle before the first click and type the segment count. Circle accepts its sides and radius through the Measurements box; adding an explicit unit overrides the model's current length unit. Radius is half the diameter. For the example above, 150mm means a 150 mm radius, not a 150 mm diameter.
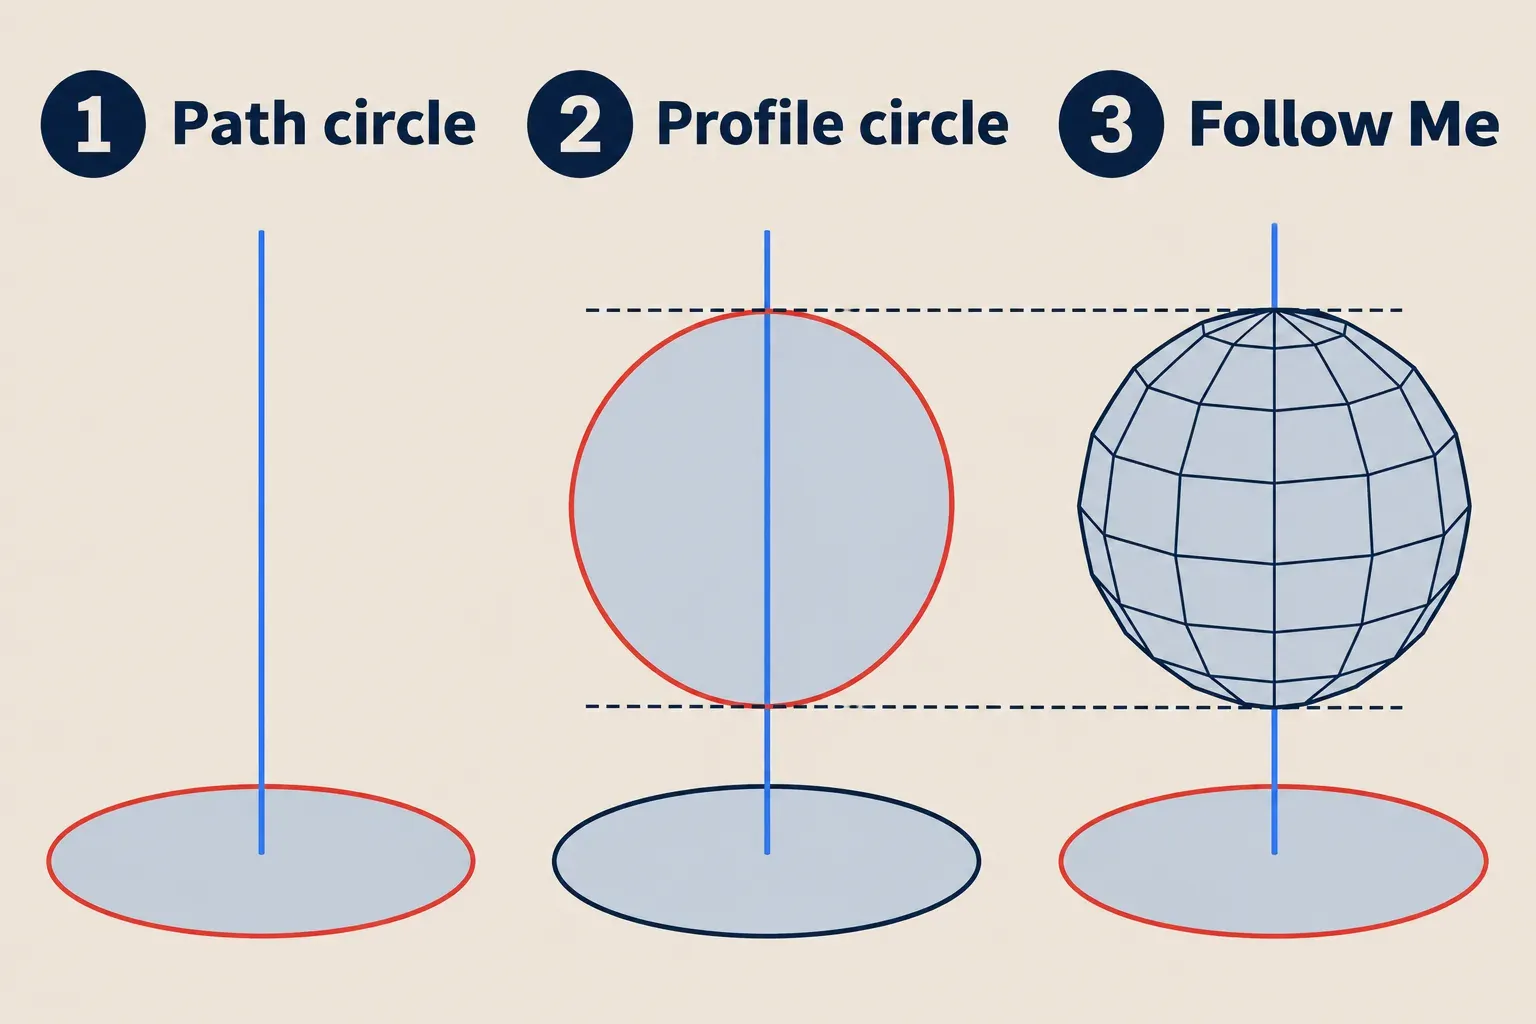

1. Draw the path circle on the ground
Activate Circle (C), set the segment count and hover over the drawing axes origin. Wait for the origin inference, keep the circle flat on the red-green ground plane, then click its center and an outside point. The path radius does not set the ball's size, so it needs no particular measurement. Check that a face fills the circle, then orbit to confirm that it lies flat.
Use the full circle as the path. Making it large enough to select separately from the finished ball keeps the cleanup straightforward. If you start at the wrong point, press Esc and draw it again.
On iPad, Circle's Lock Z mode fixes the blue plane. Set the count with Increase Segments, Decrease Segments or the Measurements box. In Click-Move-Click mode, a mouse or trackpad uses two clicks; Pencil or touch uses a hard press for the center and another to finish. Each inference lock applies to one circle.
2. Draw the upright profile and type its radius
Activate Circle again and use the same segment count. Hover over the origin, move upward along the blue axis and click the center of the new circle on that axis. Place it high enough for the ball to clear the ground circle. The circle must stand vertically, perpendicular to the ground circle.
On desktop, orbit until the red or green axis runs roughly across the screen, acquire that circle-plane inference and hold Shift if needed. You can also use the arrow keys: Right locks the red plane and Left locks the green plane. Click to finish the circle, type the radius with its unit, such as 150mm, and press Enter on Windows or Return on Mac. Keep the drawing area active; you do not need to click inside the Measurements box.
Context-click the circle's edge and choose Entity Info. Check Radius and Segments before the sweep; both fields can be edited while the entity is still a circle. Orbit once more: the profile should be upright with its center on the blue axis, and a filled face should remain inside it.

In the browser, Circle links to the same shape controls from the Expanded Toolset, and Entity Info is on the right-side panel list. On iPad, choose Lock X or Lock Y for the upright circle and enter the exact radius in Measurements while drawing. The iPad Circle guide supports numeric radius entry with every input method; its Entity Info panel shows the selected entity's measurements.
3. Select the path and sweep the profile
Activate Select and click the ground circle's edge once. A circle's connected segments act as one entity, so the entire circumference should select. Start Follow Me, then click the upright circle's face. The selected path can stop highlighting when Follow Me starts; it remains selected. You enter no number during the sweep.
Check the result by orbiting: the upright profile has become a ball and the original flat circle is still below it. Select and erase that separate ground circle after the sweep. Keep the ball's faces and edges.
On iPad, preselect the path first. Follow Me then completes the sweep with one mouse click, or a tap or long press with Pencil or touch in Click-Move-Click mode. In Just Draw mode with Pencil, swipe on the profile when the path is preselected.
For a quick freehand alternative on iPad, open AutoShape and tap Learn to see its shape gestures and examples. AutoShape's built-in guide supports Pencil and long-press touch input. The two-circle route above makes the profile radius explicit and keeps the same geometric setup across surfaces.
Choose segments for the outline, smoothing for the faces
A SketchUp circle is a chain of straight segments. Sweeping it produces flat faces, so more segments make the silhouette rounder and add geometry. Softening and smoothing change the edges and shading between those faces; they do not turn a faceted outline into a true curve.
48 is a practical starting count for this example. In TIG's explanation of circle segmentation, multiples of 3 and 4 keep useful divisions and avoid excessive geometry. In a separate discussion of a small, highly segmented sphere, DaveR suggests that 48 sides may be enough and warns about tiny faces at the poles. These are modeling recommendations, not a universal print-resolution requirement. Choose the final count for the viewing distance or the printer's tolerances.
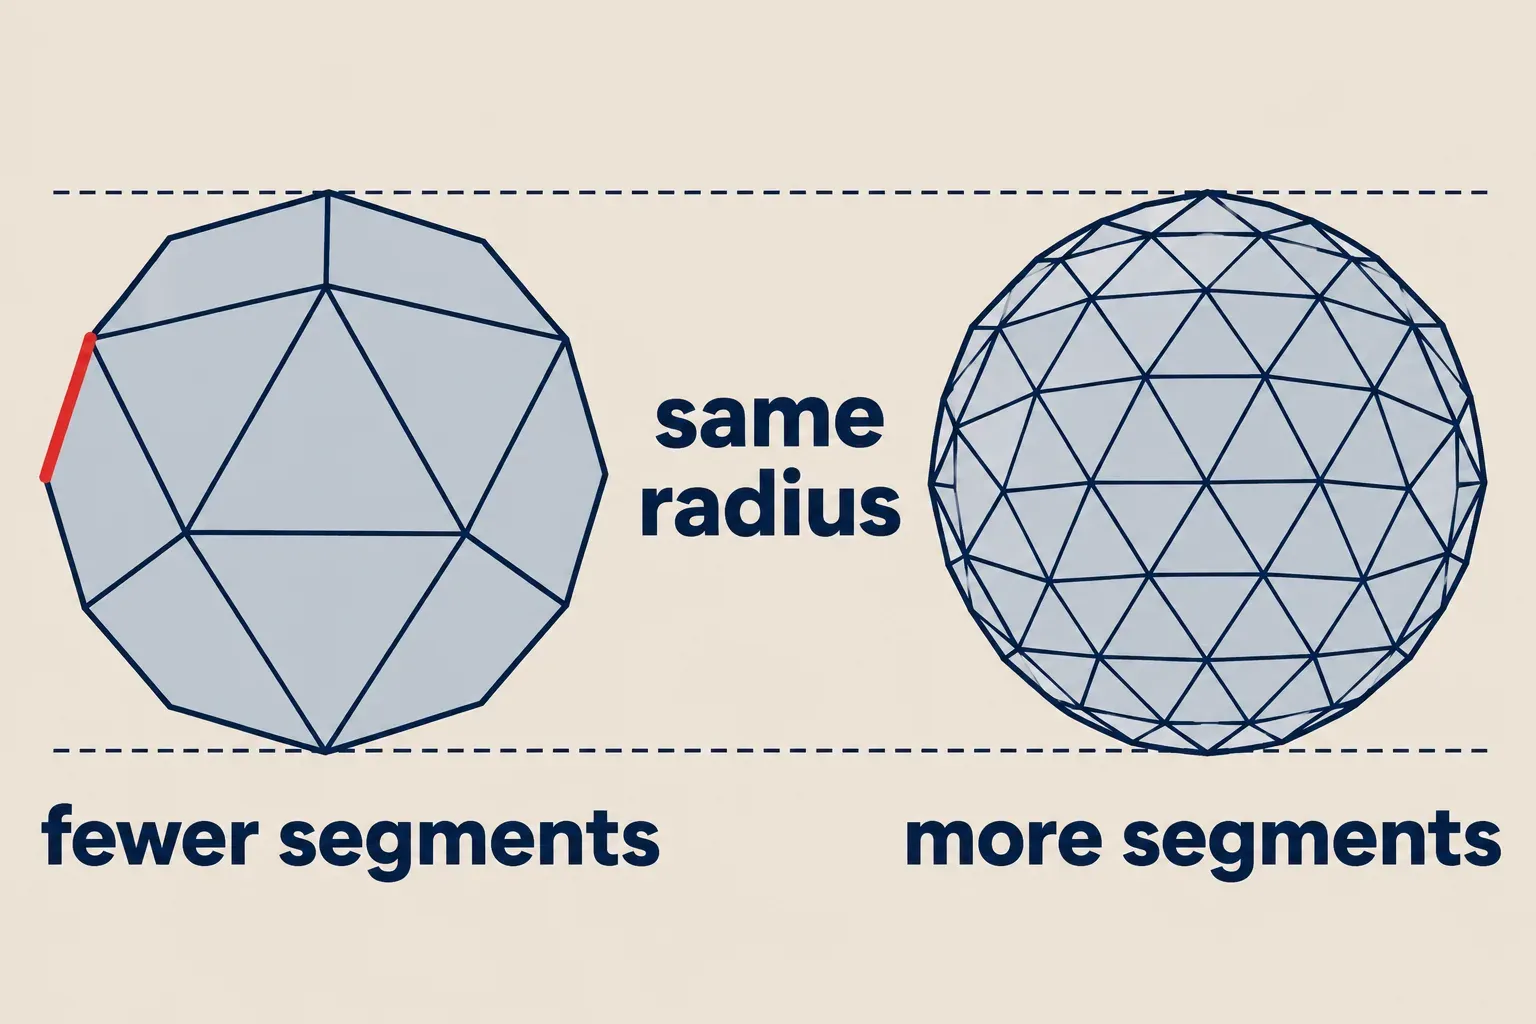

Extruding circles normally applies soft and smooth edges automatically. If hard seams remain, select the sphere's edges and use the desktop context command Soften/Smooth Edges. Adjust the angle threshold and keep Smooth normals enabled for smooth shading. In the browser, use the Soften/Smooth Edges panel on the right. On iPad, the Soften/Smooth panel provides smoothing and an Angle slider.
Fix a failed or distorted sweep
| Result | Check and repair |
|---|---|
| Nothing extrudes | Check that the upright profile has a filled face, the path is selected and both are in the same editing context. Follow Me sweeps a face, not a bare outline. |
| A ring instead of a ball | Undo and check the profile center. Keep it on the blue axis through the ground circle's center; an offset profile can form a torus. |
| A partial or skewed shape | Use the full closed circle as the path and check the profile's plane. For an intentional partial sweep, the profile must be perpendicular to the first path segment; an axis-aligned plane alone may not achieve that. |
| A small gap at a pole, or a heavy model | Undo to the two circles, reduce their segment counts in Entity Info and sweep again. For tiny details that still fail, work on a larger profile and scale the completed object down. |
The offset-profile and partial-path behaviors are discussed in the sphere thread's path-and-profile examples. DaveR's partial-sphere explanation identifies the first-segment alignment and tiny-face problems. SketchUp's own lathe workflow also recommends drawing a larger profile and scaling it down when necessary. Save a copy before changing a detailed object.
Group the sphere and check its faces
With Select, triple-click the ball to select all connected geometry. Only the ball should highlight. Choose Edit > Make Group, or the selection's Make Group context command; a bounding box confirms the container. Grouping keeps its geometry from sticking to other objects. If the ball will repeat, use a component so edits can reach its instances before you copy it into an array.
On iPad, triple-tap with Select also selects all connected entities. In the browser, Search can find and activate commands: press Shift+S and search for Make Group. Keep the selection limited to the sphere before invoking the command.
Before exporting for printing, open the group and choose View > Face Style > Monochrome on desktop. The fronts should face outward. Context-click a reversed face and choose Reverse Faces; use Orient Faces to make connected faces agree with a correctly oriented one. These are the documented face-orientation commands.
Close the group and inspect it in Entity Info: a printable closed object should identify as a Solid Group or solid component. SketchUp's printing checklist requires a solid with outward-facing fronts. A smooth-looking surface can still have an opening. Keep the full export and slicer checks in the STL workflow.
Use half a profile for a hemisphere or bowl
Keep the complete ground circle as the path. Change the upright profile before running Follow Me:
- For a solid hemisphere, draw a horizontal diameter across the upright circle with Line (L). Acquire its Center inference, then draw along the in-plane red or green axis to the circumference in both directions. The diameter should split the face into two halves.
- Erase the lower arc, leaving the upper half-disc with its straight edge across the bottom. Select the full ground-circle path, activate Follow Me and click that half-disc. Check the base and face orientation after the sweep.
- For a hollow bowl, first use Offset (F) inward on the upright circle to set the wall thickness. Divide both circles across the middle, remove their upper halves and select and delete the inner lower half-disc face. Keep the curved wall band as the profile. An upside-down version of that band makes a hollow dome.
The bowl recipe divides both circular boundaries because each is a continuous multi-segment entity. Check that only the intended curved band remains before sweeping. On iPad, Offset accepts a precise distance in Measurements with any input method. The required wall thickness comes from your object and fabrication process.
Save the model and a useful return view
Save the model after the size and container checks. A scene records the camera and display properties; it does not preserve an earlier radius or a separate copy of the geometry. If you need a different geometric version, save a separate model version before editing.
Return to the display style you want for presentation, orbit to show the whole sphere and open Scenes. Click Add Scenes, then Show Details and name the scene Sphere - overview. Camera Location saves that framing; the style is saved only with the corresponding scene property enabled. The browser has a right-side Scenes panel, and iPad provides Add Scene in its Scenes panel.
For a globe or a patterned ball, SketchUp's image-projection workflow starts with this same two-circle sphere. Keep the grouped ball at its intended size and use Sphere - overview to return to its framing as you add the material.